The Surgery : Brief Description
Fixation Surgery: The patient is placed prone on a radiolucent table to allow the use of an image intensifier. The aim is to insert two cannulated screws through the ilium into the sacrum. Once positioning is complete, two Steinmann pins are inserted across the joint under EMG monitoring and image intensification guidance. Once the Steinmann pins are in the appropriate position, incisions are made, the depth of penetration is measured and appropriate-sized 6.6mm cannulated screws are placed across the joint. If the patient’s problem is purely extra-articular, this completes the operation.
Traditional Fixation/Fusion: The method used to stabilize the SI joint is the same as the fixation. If the patient has intra-articular joint problems, a posterior incision can be made parallel and slightly lateral to the posterior SI spine extending cephalad and parallel to the iliac crest. The lumbrodorsal fascia, as it inserts onto the inner table of the ilium, is identified and stripped from its attachment, exposing the inner table of the ilium. Next, a bone graft is harvested from the inner table, which allows for improved visualization of the ligaments and joint. Then the ligamentous and cartilaginous portion of the joint are removed. Once the bone is decorticated, the bone graft is inserted. The lumbodorsal fascia is re-approximated, and the subcutaneous tissues ans skin are closed.
Fixation/Fusion with the iFuse Implant System®: With the patient in prone position, the procedure is performed through a small incision (approximately one inch long) along the side of the buttock. During the procedure, x-rays provide the surgeon with live imaging to enable proper placement of the triangular shaped, biomechanically rigorous implant designed specifically to stabilize the heavily loaded SI joint. Three to four implants are generally used, depending on the patient’s size. The porous plasma spray coating with an irregular surface supports stable bone fixation/fusion.
Piriformis Release: The piriformis muscle is released by cutting the piriformis tendon at its point of insertion at the superior border of the greater trochanter. This procedure is performed through a small incision (approximately one inch long) along the side of the buttock.
Sacroiliac Joint Stabilization Techniques
Fixation/traditional fusion with cannulated screws
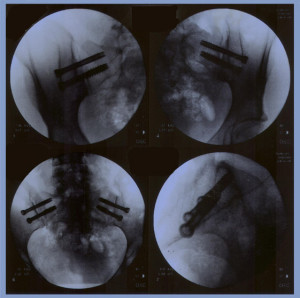 After the patients SI joint is manually corrected into proper position by a skilled physical therapist, the patient is placed prone on a radiolucent table to allow the use of an image intensifier. The aim of the operation is to insert two cannulated screws from the ilium into the sacrum. Monitoring proper placement is achived with the image intensifier by a trained technician who alerts the surgeon when close to a nerve root to avoid injury to the sacral nerve roots.
The patient is positioned so that an anterior view can be taking in a 40 cephalad neutral and 40 caudal position. A point three finger breadths lateral and at a 45 angle distal to the posterior spine is used for insertion of an 18-gauge spinal needle aiming the needle at about a 45 angle towards the PSIS. Image intensification confirms that the needle is appropriately placed in AP and lateral views. Sometimes it takes serveral repositionings of the needle to get an appropriate position.
Once the position is determined, two Steinmann pins are inserted across the joint under EMG monitoring and under image intensification guidance. Once it is determined that the Steinmann pins are in an appropriate position, incisions are made, the depth of penetration measured and appropriate-sized 6.5 cannulated screws placed across the joint. Once again, the pins should be tested to make sure there is no evidence of any nerve root irritation and, there being none, the pins are removed. The incisions are irrigated, and closed with the suture of choice. If the patient’s problem is purely extra-articular, that completes the operation.
If the patient has joint problems, a posterior skin incision can be made parallel and slightly medial to the posterior sacroiliac spine extending cephalad and parallel to the iliac crest. The lumbodorsal fascia, as it inserts onto the inner table of the ilium is identified and stripped from its attachment, exposing the inner table of the ilium. Using osteotome mallets, gouges and curettes, a bone graft is harvested from the inner table. This not only allows for better visualization of the ligaments and joint, but also gives bone graft for future grafting.
The ligamentous portion is noted in the depths of the wound and more distally, the cartilaginous portion of the joint as it tucks under the long dorsal ligament. Care is taken to avoid entering the sciatic notch. Using gouges, curettes, and tissue rongeurs, the ligamentous and cartilaginous portion of the joint are removed. The defect thus created can be prepared by decorticating the inner table of the ilium and the outer portion of the sacrum. This can be done with a burr, if desired.
Once the bone is decorticated, the bone graft is inserted. Supplemental allograft can also be used. The lumbodorsal fascia is reapproximated and the subcutaneous and skin closed.
.
Possible Risks Associated with SI Surgery
- Complications from anesthesia
- Postoperative blood clot at the surgical location
- Wound infection
- Thrombophlebitis (swelling of a vein due to a blood clot)
- Unsuccessful fusion
- Continued pain if the joint is not properly aligned (note: the SI joint should be properly aligned by an experienced physical therapist or physician trained in joint manipulation immediately before surgery)
Your surgeon is experienced in this type of surgery, but the results of this surgery cannot be guaranteed.
Potential Reasons For Unsatisfactory Outcome
A certain number of patients who, despite successful stabilization of previously unstable sacroiliac joints, either with conservative treatment or percutaneous fixation with or without supplemental fusion, continue to experience pain and dysfunction. This is largely due to associated conditions, and not due to the surgical technique itself.
Sacroiliac joint dysfunction can occur as an isolated condition or in association with other spinal disorders. Torsion injuries can cause damage to the disc annulus, facet joints, laminae, and ligaments, as well as the sacroiliac joint.
-
- Facet Joint:
Torsion or axial rotation causes the facets to flex and laterally side bend towards the site of the rotation, crushing the facet articular surfaces on the rotational side and distracting the capsule with tearing or avulsion on the side opposite the rotation. - Nerve Root:
The lateral portion of the facet joint is long and slender and is therefore easily deformed. Torsion causes facet impingement on the torsion side. Distraction on the contralateral side can stretch the nerve root. Thus, neural arch deformation can cause bilateral nerve root entrapment. - Discs:
Torsion cause annular tears, which can weaken the annulus leading to bulge or herniation of the nucleus pulposus. The iliolumbar ligament can become taut due to subluxation of the SIJ. Its fibers are attached to the transverse process at L4. Chronic tension can lead to bulging of the disc. It is not uncommon to see an L4-5 annular bulge on the MRI in patients with chronic instability. - Effect on Muscle:
A physician of physical medicine famous for studies associated with joint malalignment (Janda) has pointed out that, as the result of articular dysfunction, postural muscles become facilitated and, therefore, tighten and phasic muscles become inhibited and, therefore weaker. With longstanding dysfunction, anatomic changes of the muscle bellies take place that are irreversible. The piriformis is the most adversely affected muscle in chronic SIJ instability (piriformis syndrome). Pelvic wall muscle spasm or contraction can lead to pelvic wall dysfunction. The muscles that may be affected include the iliopsoas, hamstrings, adductors and Gluteus Maximus, as well as the quadratus lumborum and tensor fasciae late. - Piriformis Sciatica:
The piriformis muscle is frequently associated with SIJ dysfunction. The diagnosis is usually made with nerve study to check H-wave in neutral hip position and in flexed, adducted and internal rotation position. Comparison should be made bilaterally in this manner. If positive, then the piriformis can be detached at its insertion into the greater trochanter area, freeing up the sciatic nerve and allowing for the muscle to slide. Symptoms of Piriformis Syndrome: Buttock pain that radiates into the hip and lateral aspect of the leg. As the piriformis syndrome worsens the pain can radiate down the back and side of the leg to the foot. Symptoms are worsened by walking and sitting. - Effect on Nerves:
Due to longstanding spasm or secondary fibrosis, the chronically-shortened piriformis can entrap neurovascular status that accompany it through the greater sciatic foramen (superior and inferior gluteal nerves, the sciatic nerve and the pudendal nerve.) The lateral femoral cutaneous nerve passes just medial to the anterior sacroiliac spine and can be injured as it passes from the pelvis to the thigh by changes in anatomic position associated with sacroiliac subluxation (meralgia paresthetic). - Public Symphysis Instability:
With chronic instability, the contralateral SIJ, as well as the pubic symphysis may destabilies.
- Facet Joint:
Recommendations For Post Surgical Treatment
Recommendations for First Three Weeks Postop SI Fusion Surgery:
- No driving or car riding for more than one hour.
- No sitting for longer than one hour.
- No standing or walking for longer than 30 minutes.
- Avoid bending and twisting at waist.
- Sleep with a pillow between knees.
- Sit straight with a pillow to small of back.
- No lifting anything over 10 lbs.
- You may drive in approximately one week.
- Avoid stair climbing. If you do stair climb, lead with the strong leg and take one
- step at a time.
- No single leg standing.
- No exercise for three weeks.
Lifetime Activity Restrictions:
- No bungee jumping.
- No parachute jumping.
- No rock climbing.
- No step aerobics.
- No stairmaster.
- No chiropractic manipulation of the lumbar spine.
- No heavy lifting – more than 50 lbs.
Set up an appointment with your physical therapist for an initial postop evaluation at 2-3 weeks postop. To request an online appointment click here
At 2-3 weeks, you will begin Phase 1 of your SI Stabilization Program under the direction of your physical therapist. Do not begin an exercise program before this time. You should also not being a walking program until at least 6 weeks postop, and then only under the direction of your physical therapist.
Note: After you begin your walking and exercise program, if you experience buttocks pain, it could represent an irritation of the piriformis muscle. Decrease walking to a minimum.
Conservative Treatment
For more information on our conservative treatment options click here